Alright - - are you ready to finish up this chair? I am SOOOOO ready! I have to tell you, this tutorial has kicked my booty!! I have so many other projects that I have been working on this week and every night I think that I am going to write a second post about the projects I have accomplished that day - - BUT it takes me forever to write these step by step instructions, that by the time I am done, I just go straight to bed!!
Let me add this to yesterday… every chair is different and the arms are going to be done differently on each one - - so…. the best way for you to know how to do an arm, is to watch very closely as you take your fabric off - - I promise you that you will understand it much better when you see how things are put together!!
So - - after yesterday, all we had left was the back of the chair and the cushion!! woohoo!! Let’s start with the back of the chair. I love to use my Curve-ease Ply Grip to attach the back. It is the easiest stuff to work with once you learn how to use it.
Edited to add: I bought my curve-ease off ebay I got 100 feet for something like $20 - - here is the link to the ebay seller I bought it from. I have been using it for 3 years now, so I think it was definately worth the investment! In a pinch, I have been able to buy it off of local upholstery shops - - it just depends of the shop owner whether they are willing to sell it or not!!

So, here is a mini tutorial on Curve-ease Ply Grip:
I made a little mock chair frame - - so that I can use contrasting fabric for you to be able to see this clearly! This board is going to represent the frame.

I like to staple cording all the way around the back edge. Cording gives your chair a custom finished look. It also “absorbs” any gap that you might have between your ply-grip and the edge of your chair. 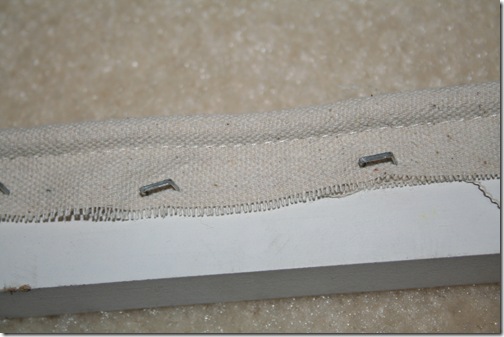

After your cording is stapled down, you are going to staple your ply-grip right in tight next to your cording. You will staple it with the flat edge (the edge with the holes) flat against the frame of your chair, and the “teeth” side sticking up with the opening facing your cording.

Once you have your ply-grip stapled down, press down on each tooth section closing the “mouth” so it is only open about a 1/4”.

Next, lay your fabric smoothly over your entire back - - placing it exactly where you want it. With a piece of soft chalk, trace the edge of your ply-grip all the way around your chair.

Trim your fabric to about 1/2” on the outside of the line you just marked.

Now, using your SMALL flathead screwdriver or an ice pick, tuck your fabric into the mouth of your curve ease letting the teeth grab your fabric. Keep working your fabric in until you can’t see any of your excess fabric.

As you go around tucking, and you get your excess fabric tucked in, press down the ply-grip with your finger so that the fabric cannot escape back out.
Once you have tucked in your fabric completely around the back of your chair, it’s time to secure it for good. Pull out your hammer and smash that ply-grip down nice and smooth all the way around!!

See, that was super easy wasn’t it?


You are going to use the ply-grip along the left side, top, and right side. Once you have that fabric secured, you will just need to pull the bottom fabric around the bottom of the chair - - smoothing it as you go and securely stapling it along the bottom frame.
Alright, our chair is completely done except for the cushion. Let me just throw a huge disclaimer in here now - - I forgot to take pictures of making the cushion! Oops! I do have to admit that it is really hard with this fabric (the black paisley) to see clearly what the pictures are showing, so, I have drawn out the plans for you and hopefully it will clear up any confusion.
Start by tracing your cushion with chalk onto your new fabric. Simply set your cushion on your fabric and right next to the foam, trace your line. - - If your cushion is a square or rectangle (as it is in this chair) I find it is easier to just measure the cushion and draw the lines on with a yard-stick - - it is much more exact. You are going to have to do this twice (once for each side of your cushion). Cut both of these pieces leaving at least 1” seam allowance all the way around.


Next, you need to sew your cording right on the line that you have drawn - - you want your cording exactly on that line because you want it to land right on the edge of your cushion.

Now, measure the height of your cushion. Take this height and add 2”. You are going to add 2” because you need a 1” seam allowance on either side of the side band so that you can attach your top and bottom. Cut a band of fabric that width (Height +2” = band width). You want to cut it long enough to go all the way around your cushion. You may have to piece this in order to get it the length that you need, just remember not to make your seam directly in the middle.

Once you have your side band cut, it is time to finish the edges. I like to make my cushions with a zipper closure and I like to make my band overlap over the edges of my zipper. So, first lets just finish the first end. Fold over the end of your band 2 times toward the wrong side of your fabric - - as if you were making a hem on a curtain. Iron this down so you have a smooth crisp edge. Go ahead and sew along this “hem” for a complete finished edge.

Now, you need to measure the entire circumference of your cushion.

Next, take the length of your zipper and subtract 6” (this is for your overlap). Subtract this # from your entire circumference.
Zipper length – 6” = NZL (New Zipper Length)
Entire Circumference – NZL = the length that you need to make you side band

Once you have figured out the length you need to make your sideband, fold up the other end and finish it just as you did the first side.
Now it’s time to attach your sideband. To figure out where to start attaching your side band, you are going to have to measure out your zipper and remember that your side band is going to overlap each end of your zipper by 3”. This is where you will start attaching your side band. Remember that you have allowed for a 1” seam allowance so keep your stitch line 1” from the edge of your sideband - - this should be tucking in right next to your cording that you attached earlier - - in fact you should be sewing exactly on the same line that you attached your cording.

Clip your corners as you go around.

Now, you are going to attach the side band to the opposite side of your cushion. You want to make sure that your top and bottom are completely lined up. My best advice for doing this is to put your side of the cushion that you just attached the side band to, right side up on a flat surface. Then, take your other side and place it right sides together on top of the first cushion – matching up your corners exactly. Pin your side band to your second side exactly where you need to attach it.
Another trick for making sure your top and bottom cushion line up perfectly is to make a crease at each 90 degree corner and cut a little slit there - - now you know that the slit needs to hit each corner perfectly.
Go ahead and sew your side band to your second side.
All we have left to do is to attach the zipper.
To cut your fabric for your zipper, follow this equation:
Width of your side band + 2” = width of each band for either side of your zipper
2 (divide your width of your side band by 2)

Rather than giving you step by step instructions on zipper installation - - go and check out this tutorial that does a fantastic job of explaining it all!!!
Now, all we have left is to attach the zipper - - you are going to do this exactly the same way that you attached the side panels - - remembering that you are going to overlap your zipper by about 3”. Once you are done attaching the zipper - - it’s time to turn it right side out and put your cushion inside!!

Now - - step back and enjoy your handy work!!


It wasn’t too complicated was it? Many of you have asked about doing couches - - here is the beauty of couches and chairs. Couches are really just really wide chairs! You might have to put a seam or two along the back of the couch and of course you are going to have more cushions to make covers for - - but I promise you that by the time you are done with all those couch cushions, you will be a pro!!!
Well - - if you have stuck with me through this all - - you certainly deserve an award!! If you have been inspired to try your hand at an upholstery job - - be sure to leave a comment with a link to pictures of your finished projects!!